● Guides · 8 min read
Budget Food Photography Backdrops: 6 Options That Look Professional
A restaurant-friendly guide to budget food photography backdrops: six inexpensive surfaces you can keep in-house to make every menu photo look consistent and clean.

The fastest way to make a menu photo look cheap is a distracting background. The fastest way to make it look professional costs almost nothing: a single, consistent, budget food photography backdrop. You do not need a prop closet or a studio — you need a few neutral surfaces you keep in-house and use every time. This guide covers six that look professional and the simple rule that makes them work.
Here is the short version: pick one main background and one secondary, prefer matte surfaces over glossy ones because matte avoids glare, and keep the backdrop consistent so your whole menu looks intentional instead of random.
Why the backdrop matters more than you think
A backdrop does two jobs. First, it controls attention — if the background competes with the food, the food loses, especially at the thumbnail size customers actually see on delivery apps. Second, it creates consistency, which is what makes a menu read as one premium brand rather than a stack of unrelated phone photos. A coherent surface across every dish is one of the cheapest brand assets a restaurant can build, and it pairs directly with consistent lighting and framing. Our restaurant menu photo audit shows how much background clutter and inconsistency drag a menu down.
6 budget backdrops that look professional
Each of these is inexpensive, durable enough to reuse for months, and easy to store in a kitchen.
1. White poster board (clean, bright)
The workhorse. White reads bright, fresh, and neutral, and it suits almost any cuisine. It is ideal for delivery-app photos where legibility beats mood. Buy a few sheets so you can swap a smudged one mid-shoot. Cost is a few dollars.
2. Light wood board (warm, friendly)
A light oak or pine board adds warmth without stealing attention, perfect for cafés, brunch, bakeries, and comfort food. A simple cutting board or a length of reclaimed wood works. It photographs warmer than white and softens the overall feel.
3. Neutral stone or tile (modern)
Slate, gray stone, or a large matte tile reads clean and contemporary. It suits modern menus, plated mains, and anything you want to feel a touch upscale. A single floor tile from a hardware store is cheap and surprisingly versatile.
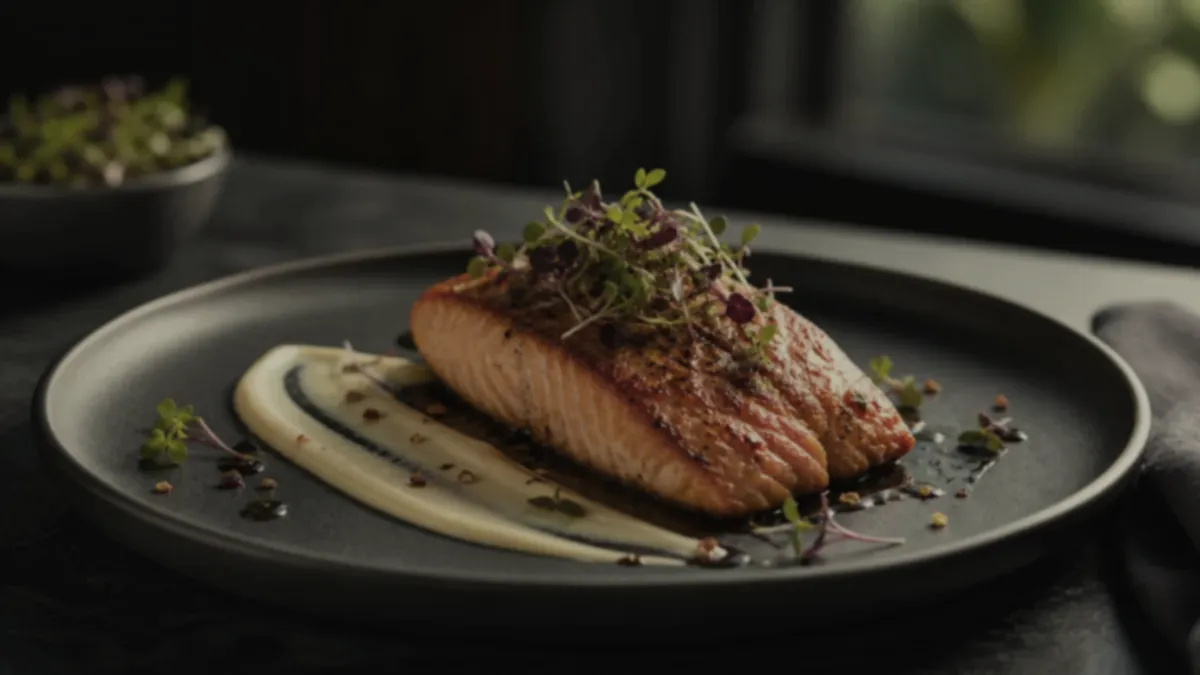
4. Matte black board (moody, premium)
A matte black surface creates a dramatic, premium look — great for cocktails, desserts, and hero dishes where you want contrast and depth. The key word is matte: a glossy black board reflects every light and is hard to manage. Use black sparingly so it stays special.
5. Baking parchment on a tray (fast "studio" look)
The cheapest trick in the kitchen. A sheet of parchment over a tray gives a clean, neutral, slightly textured surface in seconds, and you can swap it the moment it gets messy. Ideal for bakery items, fried food, and fast batch shoots.
6. Painted MDF board (custom brand colors)
If you want a surface in your exact brand color, paint an MDF board with a matte finish. This gives you a custom backdrop for a few dollars that no competitor will have. Keep the color muted — a soft brand tone reads premium, while a bright saturated one fights the food.
A quick comparison
| Backdrop | Best for | Look | Cost | | --- | --- | --- | --- | | White poster board | Delivery apps, any cuisine | Bright, neutral | $ | | Light wood board | Cafés, brunch, bakery | Warm, friendly | $ | | Neutral stone/tile | Modern menus, plated mains | Clean, modern | $ | | Matte black board | Cocktails, desserts, heroes | Moody, premium | $ | | Parchment on a tray | Bakery, fried food, batches | Clean, fast | ¢ | | Painted MDF board | Brand-specific looks | Custom | $ |
The one rule that ties it together
If the background competes with the food, it loses. Everything else is detail. That means matte over glossy, neutral over loud, and consistent over random. Pick a main surface and a backup, then photograph the whole menu on them. Resist the urge to use a new background for every dish — variety here reads as chaos, not creativity. For the look-and-feel system that surrounds this choice, our restaurant photo style guide covers backgrounds alongside palette, props, and lighting.
How to match a backdrop to your cuisine
The right surface depends on what you serve and the feeling you want to sell:
- Cafés, brunch, and bakeries: light wood or cream ceramic. Warm, friendly, and approachable — it suits pastries, lattes, and comfort food.
- Modern and upscale menus: neutral stone or slate. Clean and contemporary, it makes plated dishes feel a touch more expensive.
- Cocktails, desserts, and hero shots: matte black. The contrast makes glassware, glaze, and garnish pop. Use it as an accent, not your everyday surface.
- Fast, high-volume kitchens: white poster board or parchment. Bright, neutral, and quick to swap when it gets messy — ideal for delivery-app photos where legibility matters most.
- Brand-led concepts: a painted MDF board in a muted brand tone, used sparingly for signature items.
Pick one main surface that covers most of your menu and one accent for special items. That is the whole system.
Caring for your backdrops
Budget surfaces last a long time if you treat them well:
- Wipe matte boards with a barely damp cloth between dishes; crumbs and oil at the edge of the frame are a common, avoidable distraction.
- Store boards flat so they do not warp — a warped surface catches light unevenly.
- Keep spares of cheap surfaces like poster board and parchment so a smudge never stops a shoot.
- Replace, do not fight, a damaged board. At a few dollars each, a fresh surface is cheaper than the time spent editing around scratches and stains.
A clean, flat, matte surface is doing most of the work. The rest is lighting and a tidy frame.
Backdrops, lighting, and a clean finish
A backdrop only does its job under good light. Pair your surface with soft side window light and a white reflector — the setup in our food photography lighting guide — and most of the work is done in-camera. If a surface still photographs slightly uneven, dusty, or with a stray crumb at the edge, that is exactly the kind of thing honest AI enhancement cleans up: tidy the background and even the surface tone without changing the dish itself.
That keeps the workflow cheap and fast. Shoot every item on one consistent matte backdrop, then enhance lighting and clean any background distractions before you export delivery, website, and social crops.
Get a consistent look without overspending
A few dollars of matte board plus a clean enhancement step is enough to make an entire menu look like one professional brand. You can test the enhancement on your own photos with a one-time $2.99 Try Pack (5 credits), with plans from $4.99/month (20 credits) and credits that roll over — see the pricing page. Or drop a real backdrop photo into the Try Pack and see how clean the result looks before you change anything.